BEHAVIOUR YOU MAY EXPERIENCE:
The cassette is not drawn further into your Micro-I after you insert it.
1. MICRO-I IS TURNED OFF
It may be that your Micro-I turned off after you visited the submission page.
Resolve the issue
1. Remove the cassette
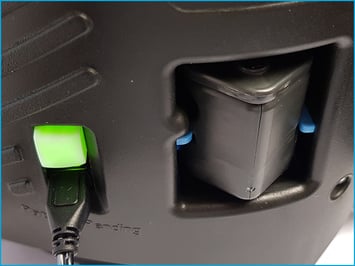
- Pull the cassette out gently from the front of your Micro-I.

2. Turn on your Micro-I
- Press the power button on your Micro-I for two seconds to turn it on:
- The power button's back-light will flash red and green before settling on green
- Your Micro-I's internal light will glow yellow and flash white before settling on solid white when ready.

3. Log in to your Micro-I
- Visit the FECPAKG2 portal and log in when prompted.

4. Return to your submission
- Select 'Edit a submission'.
- Select the relevant Micro-I, if prompted.
- Select the sample you want to submit.

5. Check your sample
- Confirm that your fill is still good:
- If not and your sample has been resting in the sedimenter/saline for less than an hour, refill the cassette.
- If not and your sample has been resting in the sedimenter/saline for longer than an hour, prepare a new sample.

6. Insert the cassette
- When prompted:
- Hold the cassette as still and level as possible.
- Gently insert the cassette into your Micro-I, leading with the pointed end.
- Ensure the cassette is pushed as far in until you feel resistance from the motors.

Help Centre
 |
Please refer to the Help Centre for a video on the recommended way of inserting a cassette at https://u.fecpakg2.com/hlp-fcpk-insrt. |
2. MICRO-I'S BATTERY CHARGE IS LOW
If the previous solution did not resolve the issue, it may be that your Micro-I 's battery's charge is too low to power up all the Micro-I's components (if applicable).
Resolve the issue
1. Remove the cassette
- Pull the cassette out gently from the front of your Micro-I.

2. Turn off your Micro-I
- If your Micro-I is on (i.e. the power button is green), press the power button for three seconds to turn it off:
- the power button's backlight will turn off after flashing red
- your Micro-I's internal light will turn off after flashing amber.

3. Connect your Micro-I to external power
- Plug your Micro-I's power adapter into a wall socket and the other end (Micro-USB) into your Micro-I.
- Turn on the power at the wall socket.

4. Turn on your Micro-I
- Press the power button on your Micro-I for two seconds to turn it on:
- the power button's backlight will flash red and green before settling on green
- your Micro-I's internal light will glow yellow and flash white before settling on solid white when ready.

5. Log in to your Micro-I
- Visit the FECPAKG2 portal and log in when prompted.

6. Return to your submission
- Select 'Edit a submission'.
- Select the relevant Micro-I, if prompted.
- Select the sample you want to submit.

7. Check your sample
- Confirm that your fill is still good:
- If not and your sample has been resting in the sedimenter/saline for less than an hour, refill the cassette
- If not and your sample has been resting in the sedimenter/saline for longer than an hour, prepare a new sample.

8. Insert the cassette
- When prompted:
- Hold the cassette as still and level as possible
- Gently insert the cassette into your Micro-I, leading with the pointed end
- Ensure the cassette is pushed as far in until you feel resistance from the motors.

3. SOFTWARE IS NOT READY TO RECEIVE THE CASSETTE
If the previous solution did not resolve the issue, it may be that the software was not ready to receive the cassette.
Resolve the issue
1. Remove the cassette
- Pull the cassette out gently from the front of your Micro-I.

2. Check your sample
- Confirm that your fill is still good:
- If not and your sample has been resting in the sedimenter/saline for less than an hour, refill the cassette
- If not and your sample has been resting in the sedimenter/saline for more than an hour, prepare a new sample.

3. Insert the cassette
- When prompted:
- Hold the cassette as still and level as possible
- Gently insert the cassette into your Micro-I, leading with the pointed end
- Ensure the cassette is pushed as far in until you feel resistance from the motors.

Help Centre
Tables can't be imported directly. Please insert an image of your table which can be found here.
 |
Please refer to the Help Centre for a video on the recommended way of inserting a cassette at https://u.fecpakg2.com/hlp-fcpk-insrt. |
4. CASSETTE IS NOT INSERTED FAR ENOUGH
If the previous solution did not resolve the issue, it may be that you did not insert the cassette far enough into the Micro-I, and the motorised wheel was not able to grab a hold of the cassette.
Resolve the issue
1. Remove the cassette
- Pull the cassette out gently from the front of your Micro-I.

2. Reload the web page
- Refresh your web page by holding down the 'Ctrl' key while pressing 'F5'.

3. Return to your submission
- If you were taken away from the sample submission form:
- Select 'Edit a submission'
- Select the sample you want to submit.

4. Check your sample
- Confirm that your fill is still good:
- if not and your sample has been resting in the sedimenter/saline for less than an hour, refill the cassette
- if not and your sample has been resting in the sedimenter/saline for more than an hour, prepare a new sample.

5. Insert the cassette
- When prompted:
- Hold the cassette as still and level as possible
- Gently insert the cassette into your Micro-I, leading with the pointed end
- Ensure the cassette is pushed as far in until you feel resistance from the motors.

Help Centre
 |
Please refer to the Help Centre for a video on the recommended way of inserting a cassette at https://u.fecpakg2.com/hlp-fcpk-insrt. |
5. CASSETTE HAS EXPANDED
If the previous solution did not resolve the issue, it may be that the cassette expanded due to heat or continual use, which might prevent the motorised wheel from grabbing a hold of the cassette and drawing it in.
Resolve the issue
1. Remove the cassette
- Pull the cassette out gently from the front of your Micro-I.

2. Clean the cassette
- Empty the cassette safely.
- Rinse the cassette under running water:
- Do not touch the rods in the wells.
- Do not put any hard instruments in the wells.
- Do not use any harsh chemicals.
- Ensure that the external surfaces are clear of residue and debris.

3. Inspect the cassette:
- Place the cassette on its side on a flat, hard surface.
- Apply downward pressure to close any visible gaps where the two sides of the cassette join.

4. Refill the cassette
- If your sample has been resting in the sedimenter/saline for less than an hour, refill the cassette.
- Prepare a new sample if the sample has been resting in the sedimenter/saline for more than an hour.

5. Reload the web page
- Refresh your web page by holding down the 'Ctrl' key while pressing 'F5'.

6. Return to your submission
- If you were taken away from the sample submission form:
- select 'Edit a submission'
- select the sample you want to submit.

7. Insert the cassette
- When prompted:
- Hold the cassette as still and level as possible
- Gently insert the cassette into your Micro-I, leading with the pointed end
- Ensure the cassette is pushed as far in until you feel resistance from the motors.

Help Centre
 |
Please refer to the Help Centre for further information on cleaning your equipment at https://online.fecpakg2.com/help-clean-equipment. |
6. DEBRIS ATTACHED TO THE OUTSIDE OF THE CASSETTE AND/OR THE INSIDE OF THE MICRO-I
If the previous solution did not resolve the issue, it may be that debris is attached to the outside of the cassette or the inside of the Micro-I, which might prevent the motorised wheel from grabbing a hold of the cassette and drawing it in. There is a solution you can try yourself.
Resolve the issue
1. Remove the cassette
- Pull the cassette out gently from the front of your Micro-I.

2. Clean the cassette
- Empty the cassette safely.
- Rinse the cassette under running water:
- Do not touch the rods in the wells.
- Do not put any hard instruments in the wells.
- Do not use any harsh chemicals.
- Ensure that the external surfaces are clear of residue and debris.

3. Clean the Micro-I
- Please follow the instructions in the User Guide, and clean your Micro-I:
- Do not submerge in water - use a dry cloth or compressed air only
- Do not use harsh chemicals.
- Ensure that the bottom and sides of the Micro-I's chamber are clear of residue and debris.
4. Refill the cassette
- If your sample has been resting in the sedimenter/saline for less than an hour, refill the cassette.
- Prepare a new sample if the sample has been resting in the sedimenter/saline for more than an hour.

5. Reload the web page
- Refresh your web page by holding down the 'Ctrl' key while pressing 'F5'.

6. Return to your submission
- If you were taken away from the sample submission form:
- select 'Edit a submission'
- select the sample you want to submit.

7. Insert the cassette
- When prompted:
- Hold the cassette as still and level as possible
- Gently insert the cassette into your Micro-I, leading with the pointed end
- Ensure the cassette is pushed as far in until you feel resistance from the motors.

Help Centre
 |
Please refer to the Help Centre for further information on cleaning your equipment at https://online.fecpakg2.com/help-clean-equipment. |
7. PROXIMITY SENSOR DOES NOT DETECT THE CASSETTE
If the previous solution did not resolve the issue, it may be that the proximity sensor did not detect the cassette.
Resolve the issue
1. Remove the cassette
- Pull the cassette out gently from the front of your Micro-I.

2. Turn off your Micro-I
- If your Micro-I is on (i.e. the power button is green), press the power button for three seconds to turn it off:
- the power button's backlight will turn off after flashing red
- your Micro-I's internal light will turn off after flashing amber.

3. Inspect your Micro-I
- Check inside your Micro-I chamber to see if the reflective strip is attached to the top, and is not bent or folded over.

4. If the reflective strip is properly attached
- Turn on your Micro-I
- Press the power button on your Micro-I for two seconds to turn it on:
- The power button's backlight will flash red and green before settling on green.
- Your Micro-I's internal light will glow yellow and flash white before settling on solid white when ready.
- Press the power button on your Micro-I for two seconds to turn it on:

- Log in to your Micro-I
- Visit the FECPAKG2 portal and log in when prompted.

- Return to your submission
- Select 'Edit a submission'.
- Select the relevant Micro-I, if prompted.
- Select the sample you want to submit.

- Check your sample
- Confirm that your fill is still good:
- If not and your sample has been resting in the sedimenter/saline for less than an hour, refill the cassette
- If not and your sample has been resting in the sedimenter/saline for more than an hour, prepare a new sample.
- Confirm that your fill is still good:

- Insert the cassette
- When prompted:
- Hold the cassette as still and level as possible
- Gently insert the cassette into your Micro-I, leading with the pointed end
- Ensure the cassette is pushed as far in until you feel resistance from the motors.
- When prompted:

5. If the reflective strip is not properly attached or your sample images are still partially or completely black, prepare your Micro-I for Techion Support to connect to it remotely
- Connect your Micro-I to your network:
- Move your Micro-I near your Wi-Fi router or network access point
- Plug one end of the Ethernet cable into your Micro-I and the other end into your Wi-Fi router or network access point.

- Connect your Micro-I to external power:
- Plug your Micro-I's power adapter into a wall socket and the other end (Micro-USB) into your Micro-I.
- Turn on the power at the wall socket.

- Turn on your Micro-I:
- Press the power button on your Micro-I for two seconds to turn it on:
- The power button's backlight will flash red and green before settling on green.
- Your Micro-I's internal light will glow yellow and flash white before settling on solid white when ready.
- Press the power button on your Micro-I for two seconds to turn it on:

- Insert a cassette:
- Insert a full cassette partway through your Micro-I, gently pushing it in until the cassette starts protruding out the back of your Micro-I.

6. Contact Techion Support
- Please contact Techion Support via https://u.fecpakg2.com/support, and provide:
- The serial number of your Micro-I (i.e. MX-MIC-XXXX-X-XXXXXXXXXX)
- Your first and last names
- Your email address
- Your telephone number
- Mention if the reflective tape is present, bent, folded over, or not attached at all.

7. For Techion Support
Help Centre
 |
Please refer to the Help Centre for a video on the recommended way of inserting a cassette at https://u.fecpakg2.com/hlp-fcpk-insrt. |
BEHAVIOUR YOU MAY EXPERIENCE:
The cassette is not drawn further into your Micro-I after you insert it when navigating to the submission form from https://online.fecpakg2.com.
8. MICRO-I LOST ITS CONNECTION TO THE NETWORK
If the previous solution did not resolve the issue, it may be that your Micro-I was disconnected from your network after you visited the submission page:
- your Micro-I, Wi-Fi router or network access point dropped the connection
- the Ethernet cable, if used, was removed.
Resolve the issue
1. Remove the cassette
- Pull the cassette out gently from the front of your Micro-I.

2. Turn off your Micro-I
- If your Micro-I is on (i.e. the power button is green), press the power button for three seconds to turn it off:
- the power button's backlight will turn off after flashing red
- your Micro-I's internal light will turn off after flashing amber.

3. Inspect the equipment
- If applicable, check that the Ethernet cable is plugged in and is not visibly damaged.
- If the Ethernet cable is visibly damaged, please replace it.

4. Turn on your Micro-I
- Press the power button on your Micro-I for two seconds to turn it on:
- The power button's backlight will flash red and green before settling on green.
- Your Micro-I's internal light will glow yellow and flash white before settling on solid white when ready.

5. Log in to your Micro-I
- Visit the FECPAKG2 portal and log in when prompted.

6. Return to your submission
- Select 'Edit a submission'.
- Select the relevant Micro-I, if prompted.
- Select the sample you want to submit.

7. Check your sample
- Confirm that your fill is still good:
- if not and your sample has been resting in the sedimenter/saline for less than an hour, refill the cassette
- if not and your sample has been resting in the sedimenter/saline for more than an hour, prepare a new sample.

8. Insert the cassette
- When prompted:
- Hold the cassette as still and level as possible
- Gently insert the cassette into your Micro-I, leading with the pointed end
- Ensure the cassette is pushed as far in until you feel resistance from the motors.

Help Centre
 |
Please refer to the Help Centre for further information on connecting your Micro-I to the Internet at https://online.fecpakg2.com/help-ethernet. |
9. ANOTHER MICRO-I IS SELECTED
If you have two or more Micro-Is and the previous solution did not resolve the issue, it may be that you chose a different Micro-I to the one you are inserting the cassette into after selecting 'Create a submission', 'Edit a submission' or 'Upload submissions'.
Resolve the issue
1. Return to your submission
- Select 'Edit a submission'.
- Select the relevant Micro-I, if prompted.
- Select the sample you want to submit.

2. Check your sample
- Confirm that your fill is still good:
- if not and your sample has been resting in the sedimenter/saline for less than an hour, refill the cassette
- if not and your sample has been resting in the sedimenter/saline for more than an hour, prepare a new sample.

3. Insert the cassette
- When prompted:
- Hold the cassette as still and level as possible
- Gently insert the cassette into your Micro-I, leading with the pointed end
- Ensure the cassette is pushed as far in until you feel resistance from the motors.

Help Centre
 |
Please refer to the Help Centre for information on submitting a sample https://online.fecpakg2.com/user-guide/help-submit-sample. |